

How To Comment On A Fc2 Blog
Leave comments on entries that you read, let the poster know your opinion or any ideas you have. Engage the poster so that they can write even more interesting entries! This manual will show you how to leave a comment, reply to a comment or block comments.
Writing a comment
The following are items on the comment form that can be filled in when you leave a comment.
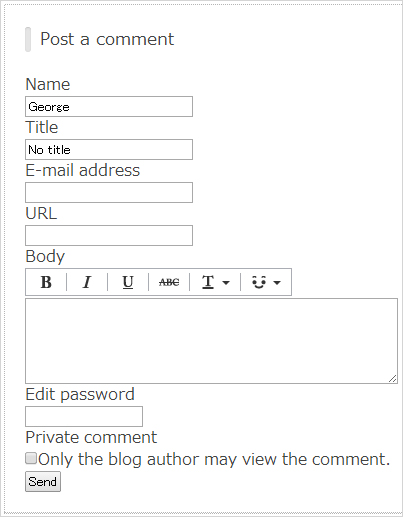
Name:
Name of the poster. The username you use for FC2 Blog is best.
Subject:
This is the title of the comment.
Email address:
Poster's email address.
URL:
Enter the URL for your blog or personal site.
(There are shared templates that may not have functioning links)
Comment:
Write your comment here.
Password:
This is the password set so that you can edit your comment. If you have already set your password you can delete or change the contents of your comment.
A trip will be created for your password. (A trip is a coded sequence for your password).
Private Comment:
This is a function that allows only the author of the entry to see your comment. Any comments set as private will not be displayed on blogs. Only the owner of the blog that the private comment was posted to can read it. However, content cannot be changed, edited or deleted once it has been sent.
-The title for each of the items for the form may be different depending on the template.
-If a comment is public, anyone accessing the blog can see the comment content, so please be careful when writing your email address.
-The comment section is the only required field. You can post a comment without filling in any other items.
- Cookies issued when comments were posted on other FC2 Blog entries may automatically fill in your name, etc.
*If you use a FC2 template, all of the items on the comment form will be uniform.
*If you are using a shared or customized template then parts of the comment form may have been intentionally left out.
(There are shared templates that has no comment function)
These are templates that have had the relevant form tags removed from their HTML and does not mean that something is wrong with the FC2 Blog system. If you need to, please change to a template that has the standard comment form.
Comment Font Effects
You cannot use HTML in the comment section. URLs in the post content will be automatically linked. You can turn automatic linking of URLs off or on through the control panel.
A unique syntax is used to apply font effects. You will not be able to preview this syntax though because the tags will be converted after the comment is posted. Your highlighted text will be surrounded with substitute tags after clicking on the button for the desired text effect. If your template does support font effect tags, you can still add your own code to the text to add effects.
For example bold:[b]TEXT[/b]
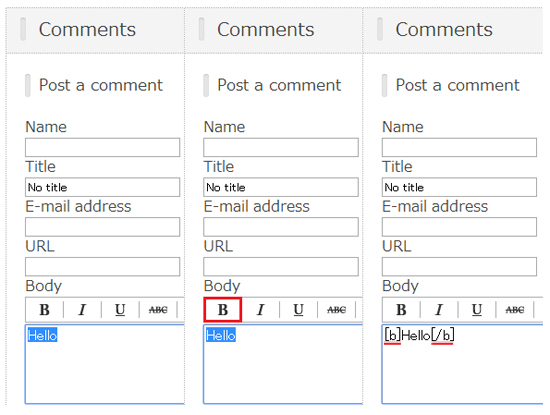
Substitute for brackets for your HTML orders is [ ] [/]
[b]Makes text bold [/b]
[i]Italicise text[/i]
[u]Underline text[/u]
[s]Strike through[/s]
[color:FF0000] Select number and change text color [/color]
You can also use emoticons in your comment.
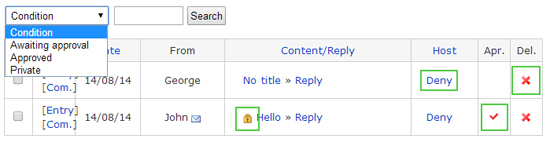
Delete a Comment
You can delete a comment through the control panel as well as deal with spam comments or unwanted advertisements by going to the Home menu > manage Comments and then delete the unwanted comment by clicking on the X mark.
*If you are the poster of the comment you can edit or delete a comment if you have set a password.
Manage trackbacks and comments Comment and Trackback Settings
Stop Receiving Comments
If you do not need the comment function anymore, you can completely remove the comment function. This can be set for each individual entry. Go to Write a New Entry or Past entries and find Accept comments? and click on No.
Refer: Entry Settings
However, if you do not want to set this function every time for each entry you can set a default value in settings. Go to Settings> click on Blog > Post settings and find Accept Comments? and click on No.
Approve Comments
Use the approval setting to stop comments from being displayed until they have been checked and approved.
Go to Settings > Blog Settings > Comment Settings> Approval Settings and choose the appropriate setting.
If the blog administrator posts a comment to your own blog, the comment can be displayed without approval if they are logged in.
Comment and Trackback Settings
Posted comments are confirmed and approved on the control screen. After they have been approved they will be displayed on the blog.
Comment and Trackback Settings
Read Private Comments
Private comments to the administrator can be read through the control panel.
First go to Notifications on your control panel then click on Comments, comments with a lock are private comments.

You can also select and show only private comments.
Comment and Trackback Settings
Prevent Private Comments
You can set it so that private messages for the administrator do not appear at all.
Go to Settings, Blog Settings, Comments and turn off the Display private comments tab.
The Private button will stay on the comment entry form, but if they are blocked private messages will be denied when they are sent.
Comment and Trackback Settings
Block specific comments
You want to accept comments, but you don't want to have to approve them? Well you can block annoying comments, spam, and other unwanted comments by specifying conditions to block them.
First method is blocking the IP. By adding the IP of the comment poster to the block list messages from that poster will not be sent.
However, it may not be entirely effective because the IP may not be fixed according to the poster.
That or they are accessing your blog by changing route and as such cannot be blocked.
Second method, set taboo words. By setting words such as "Adult" and "Unauthorised Advertisement" any comments with those blocked words will be blocked.
Block Comments and Trackbacks
How To Comment On A Fc2 Blog
Source: http://fc2blogmanualen.blog.fc2.com/blog-entry-206.html
Posted by: tedderdiecaut.blogspot.com
0 Response to "How To Comment On A Fc2 Blog"
Post a Comment